Math - Triangle Rasterizer
Warning: lengthy post ahead! But lots of really cool stuff!
Been a while since I posted now. There are a couple of reasons for this:
- First of all, I decided to write my own software triangle rasterizer (I’ll get to explain what that is in a bit)
- It’s a lot of math involved. And a lot of diagrams with pen and paper. I has spent several hours to get it to its current working state
- My parental leave is getting close to the end. My kids are now almost 16 months and require a lot of attention! Have not gotten any computer time at all for the past three weeks
But now I finally have something to show, so lets show it!
What is a rasterizer?
A 3D model is built by triangles (in my previous post I built a spinning cube out of triangles). A rasterizer is the algorithm that takes three points (in screen space) and plots each pixel to form the triangle on screen.
Why build my own rasterizer?
- In my previous post I could only fill a triangle with a solid color. I want to be fill it with a texture!
- When I can map textures myself, I can also - pretty easily - apply some interesting stuff such as lightmaps
- Also, the sorting order will be easy to solve as I can easily add a depth buffer. That means I’ll get sorting order per pixel, which I could not do on my previous solution.
But note that in computer graphics programming today you don’t write your own rasterizer. This will be done for you on the graphics card where hardware is specifically built for this. However, I like to figure out how everything works under the hood!
Lets start!
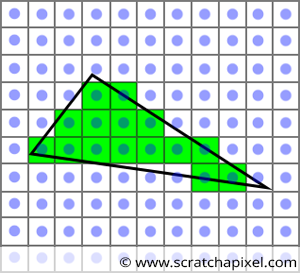
First of all we need to draw the pixels of a triangle on screen!
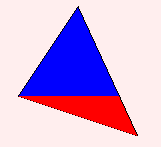
There is a method that is super fast, called “scan line”. You start at the top and draw a line from left to right for each y of the triangle. It’s super fast! It only works on the actually affected pixels, and it only requires two additions for each scan line, and two additions for each x-step! However, for it to work you must split the triangle into two sections with a flat bottom and a flat top!
In the image below the top segment is colored blue and the bottom segment is colored red.
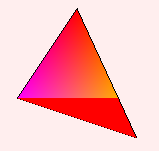
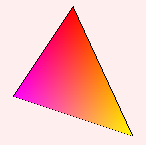
Next we want to assign values to the three points! Lets start simple and assign colors. The top point is red, the left point is magenta and the bottom point is yellow.
Now we need to interpolate the color for each pixel depending on how far it is from each point. Will result in a nice gradient.
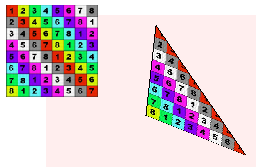
Next we want to assign a texture! Instead of interpolating colors we now interpolate texture coordinates, also called UV-coordinates.
It’s basically the same as the gradient above, but instead of interpolating a color we interpolate which pixel from the texture we should use.
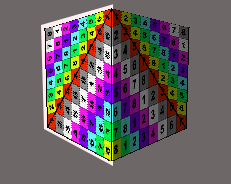
All right, now that uv-mapping triangles work, lets plug it into the spinning cube from the previous post!

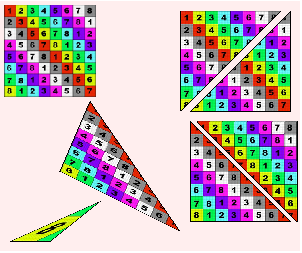
Missing Perspective Correction!
If you look close at the animation above you might notice that something looks odd (it might be hard to see since it’s moving pretty fast)! We are only stretching the texture for each triangle, but we don’t take perspective into consideration! Look close at the image below!
The top-left triangle seems to be skewed upwards, and the bottom right triangle too!
This looks really weird, and will have to be my next task! But still, I feel pretty damn proud to have come this far!
Resources for all this:
Software Rasterization Algorithms for Filling Triangles http://www.sunshine2k.de/coding/java/TriangleRasterization/TriangleRasterization.html
Drawing Triangles. Rasterization Tutorial (and UV mapping). http://www.hugi.scene.org/online/coding/hugi%2017%20-%20cotriang.htm
Next up: perspective correction, applying light, normal maps and implementing a z-buffer