Wonderglade is the second game from Resolution Games I worked on (also the second game they released). It’s a collection of mini games in a theme park setting, and it was released for Google Daydream, their mobile vr project. The game was released for free, and has really good ratings!
A while back I found all the raw material for a game me and Simon were working on a long time ago (actually before both Ripple and Metro Siberia, so somewhere around 2006 – whoa, thats TEN YEARS ago!!) called Kingsmountain, and I’ve been playing with the idea to try and recreate one of the minigames.
My first attempt was with Haxe, and a 2d skeletal animation tool called Spine. However, the Haxe runtime implementation for Spine was buggy as hell, and I spent many hours trying to animate the running little dude, but finally the bugs made me give up.
Instead I restarted the project in Unity, and here you can see the result after just about 2-3 hours.
Today is the last day of my parental leave. For 6 months I’ve been home with my twin daughters (they were almost 9 months old when I started, and soon 16 months).
I’ve spent a lot of time with them, but I have managed to stay creative in the few hours every now and then when they were taking naps. I have to say I’m a bit impressed in retrospect!
READ MORE >>Warning: lengthy post ahead! But lots of really cool stuff!
Been a while since I posted now. There are a couple of reasons for this:
But now I finally have something to show, so lets show it!
READ MORE >>A few days ago I came across Markdeep. A simple way to write formatted documents using markdown syntax.
I think markdown syntax is nice, and I’m already using it for all content on this site.
The idea is that you only need a small snippet of javascript text in the bottom of the document. You edit it in your regular notepad app, and view it through a browser. It will fall back to unformatted markdown text (still pretty readable) if it cannot fetch the javascript file.
However the original markdeep.js has a big flaw. At least for me! It cannot detect single line breaks! Like this one. So I modified it a bit.
If you want to use it, just copy and paste the following snippet in the bottom of a text document, and make sure the file ending is .html
.
<!-- Markdeep: --><style class="fallback">body{visibility:hidden;white-space:pre;font-family:monospace}</style><script src="http://salomonsson.se/md/markdeep.min.js"></script><script src="http://salomonsson.se/md/markdeep.min.js"></script><script>window.alreadyProcessedMarkdeep||(document.body.style.visibility="visible")</script>
You might want to paste the following at the very top
<meta charset="utf-8">
Up to this point I’ve only drawn wireframes. To create colored 3d objects I need two things. Backface Culling and Z Sorting. Time to start with the first: Backface Culling.
Now you no longer see any lines “behind” the cubes. I also draw the normal vectors for each triangle.
From this point I just filled the triangles with a single color.
With the normal vectors already calculated on each triangle, I tried to implement some directional lighting as well. It went much smoother than I would ever have thought.
Pretty interesting! I made a spinning cube with lighting almost exactly ten years ago. However I did not understand much of it, and going back to that tutorial it seems to be full of weird tricks. This time however I did it all by myself =D.
Next up is Z-Sorting so we can have more than just one cube at once
I’m doing serious progress! Today I managed to get the camera matrix working!
The coolest thing about this is that just a few months ago I would have thought that this was too much math for me to ever be able to understand! Remember that I have written everything from scratch - except for the line render code, which is basically just a lineTo(x,y)
function. Even the matrix implementation.
There’s no frustum culling in there yet (except for any z-values behind the camera) so pretty much everything gets drawn all the time.
Resources for camera matrix: Camera View Transform Matrix Faster Matrix Inversions
In our last blog post we used matrices to translate, rotate and scale vectors, but so far only in 2D.
Transforming vectors in 3D is pretty much the same thing. The only difference is that we cannot directly plot those vectors out on the screen since each vector will come in a triplet of {x,y,z} and the screen only consists of {x,y}.
We could just ignore the Z-coordinate, but that would look weird!
To get it to look right we need to apply perspective. Perspective means that an object that is further away from our eye will appear smaller than an object that is closer!
Applying perspective to 3D-points is something I’ve been able to do for a long time, but now we’re working with matrices, and of course there is something called a perspective projection matrix!
Another great resource I found on the subject is scratchpixel.com, here on Perspective Matrix Projection.
In the past when I’ve been playing with 3D, I’ve used trigonometry for all transformations. It works, but has several drawbacks!
Using matrices is superior by far. The image below is just a couple of matrices combined, using vectors forming a cube and a pyramid. This would not have been possible using my old 2006 methods!
If you want to read up on this too, then check out:
Math for game developers youtube channel And http://www.scratchapixel.com/index.php?nocategory
After my Shader Week I decided to try to re-wake the math part of my brain that feels like it has numbed of a bit in recent years of Android app development. I have actually been doing this for several weeks now, but have not had anything to show until now.
So I started reading up on Linear Algebra, and is currently writing my own custom implementation of Vector and Matrix-classes from scratch in Haxe. And it’s super interesting!
If you have a 2x2 matrix you can put an up-vector in the first column and a right-vector in the second column. When multiplying a vector with this rotation-matrix it will transform the vector into that coordinate space! If you rotate the up and right-vector clockwise each frame you get a rotation matrix!
In this first image I multiply four 2d-vectors through a rotation matrix. The unmodified vectors are shown to the left.
Another interesting thing with matrices is that you can combine them! If you have one matrix for translation, one for rotation and one matrix for scaling, you can get a single matrix containing all those values by multiplying them! Just remember to multiply them in the correct order!
If you have a TRS-matrix named M1, and another TRS-matrix named M2, you can move the transformation of M2 into the local coordinate space of M1 by multiplying M2 with M1! By doing this M2 will be “parented” to M1! It’s so simple!
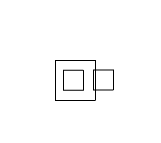
The big square is rotating and the second, smaller square is parented to the big one, therefore inheriting its rotation. Same with the third square (it inherits both the rotation and scale of it’s parent before applying its own rotation).
The vectors (points) for all three squares are just a single unmodified array. All the transformations are done though a single matrix multiplication (for each point).
I will keep working through the math, so expect more posts on this. In the mean time, these two youtube playlists are really great resources:
Made a huge optimization in the way Seagal filters list of entities that contains specific components!
Using the macro I’ve written two days ago as a base I now use bitflags instead of multiple for-loops and several Std.is(classA, classB)
. I now just use simple bit-flag comparison as the macro auto-generates a unique bitflag for each component class, and the result is stunning!
I actually had to go back to my old test and change the number of entities from 10,000 to 100,000!!!
Note 1: Both test 2 and test 3 took 0.001 seconds when running 10,000 entities. That’s why I had to increase the number of entities.
Note 2: Test 2 now takes only 0.007 seconds with that huge amount of entities!
Note 3: Running identical test 3 with 100,000 entities on Edge gives an approx time of 0.049 seconds, even slower than my own old solution…
High fiving myself
When reading up on the Edge-entity system in the post about TLDR I got an idea on how to speed up my Seagal enging a lot using macros. The problem is that macros is a subject with few tutorials and resources online, and it seems a lot of people are afraid to look into it.
I will try to explain what macros are, some good places to start learning more, and a cool example that I’ll expand upon to improve the speed of Seagal!
READ MORE >>I’ve downloaded and tried a new exciting ECS-framework called Edge. The interesting thing about it is that it relies heavily on haxe macros to generate code at compile time that will remove of the costly runtime type checking.
I did a similar test to test number 3 in my TLDR - Part 2. Only the third test was interesting to me.
And look! It’s taking between 4 and 5 milliseconds here as well! That was surprising, I really though you had to try hard to be slower than my current implementation.
However, using macros seems super interesting. and I just got an idea on how I could use macros in seagal that might speed the matching up quite a bit!
The source code for all 7 days can be found here: https://github.com/Tommislav/unity_shaderweek
It has been a successful and interesting experiment, commiting 7 days to shader programming. As I’m on parental leave I could only spend about an hour a day for this, but I think I managed to get quite far! Apart from what’s visible here, I spent 3-4 days reading or researching, but did not count those as I wanted visible examples for each day.
One problem with only having about an hour a day, and only doing tutorials is that you don’t get much time to modify/experiment/fix bugs. But I early decided that my focus this week would be learning, and that I will do a second shader week where I experiment and create my own shader effects instead.
Last day on my shader week. Not sure what to do when a friend of mine suggested that I do a “wobbly water shader”. Well, I guess you could do it pretty simple by using a displacement map as in day 2, so I used another approach manipulating the vertexes with a sine-wave instead.
I used this tutorial as base http://www.alcove-games.com/opengl-es-2-tutorials/vertex-shader-for-tiled-water/ but re-wrote it in CG